

What is Ingress in Kubernetes?
Ingress is a core Kubernetes resource that manages external access to the applications deployed in your cluster. You can think of it as the front door to the applications hosted in your cluster. It defines rules for routing HTTP and HTTPS traffic to your applications based on URLs, host names, and paths.
For an example, let’s say you have a multi app setup, where you have hosted 2 apps on the same cluster, but using different subdomains. Ingress will allow you to route the requests to the correct application based on the URL. Or you can have both the development environment and the test environment of the same app in the same cluster. They could be using the same URL but different paths. Again, you can achieve this setup with the help of Ingress.
In this article, we are going to have a look at Ingress in Kubernetes and how it is used and implemented.
Two Main Components of Ingress
If you have been reading the previous articles in this Kubernetes series, you know by now that to deploy a certain Kubernetes resource like a Deployment, Pod or a ConfigMap, all you need to do is write a manifest file in YAML format and deploy it. However, Ingress is not a standalone component like that. In order for Ingress to work, you need both an Ingress Controller and Ingress resources working together.
Ingress Resource
This is a Kubernetes resource type similar to Deployment, Pod, ConfigMap, Secret etc. that defines routing rules for one or more Kubernetes Services, which in turn will forward the traffic to the Pod it serves.
- Must be created in the same namespace as the Service it routes to.
- Will only be picked up if a compatible Ingress Controller is running.
Ingress Controller
Ingress Controller is a separate Deployment that acts as a reverse proxy. It listens for incoming requests and based on the routing rules defined in Ingress resources, routes them to appropriate services in your cluster.
- Typically deployed as a Deployment with a matching service.
- Deployed in its own namespace, separated from Kubernetes control plane components and application namespaces.
- Regardless of the namespace where the Ingress Controller is deployed, it can read Ingress resources created in any namespace within the cluster.
- The Ingress Controller watches all namespaces—but it won’t route traffic unless you define matching Ingress resources in the target namespaces.
A Simple Hands-on Guide about Ingress Using Minikube
Now let’s do a simple exercise, to see what we discussed in practice! For this, we are going to use Minikube. In Minikube, we can enable a web app called “Kubernetes Dashboard”, which allows us to monitor the resources within the cluster. It also provides an Ingress Controller as an add-on, which just saves us the trouble of having to install it on our own.
Step 1: Launch the Dashboard
We can start the Kubernetes Dashboard by running the minikube dashboard command.
$ minikube dashboard
* Enabling dashboard ...
- Using image kubernetesui/dashboard:v2.3.1
- Using image kubernetesui/metrics-scraper:v1.0.7
* Verifying dashboard health ...
* Launching proxy ...
* Verifying proxy health ...
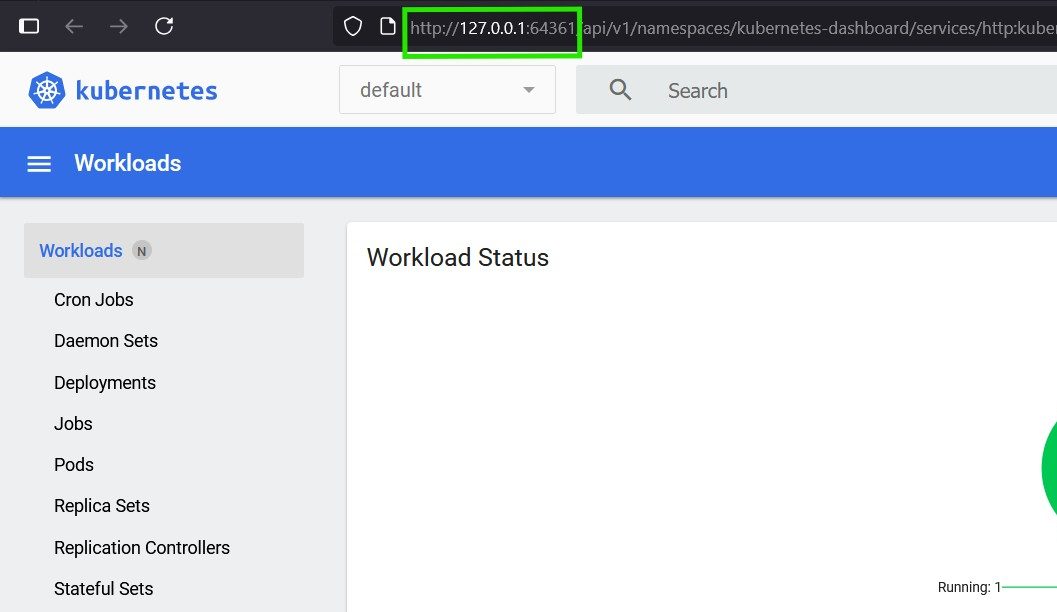
* Opening http://127.0.0.1:64224/api/v1/namespaces/kubernetes-dashboard/services/http:kubernetes-dashboard:/proxy/ in your default browser...This will open the dashboard in a browser window as follows. Notice the host and the port in the URL.
You will also notice that this creates a new namespace in the Minikube cluster called kubernetes-dashboard.
$ kubectl get ns
NAME                   STATUS   AGE
default                Active   47m
kube-node-lease        Active   47m
kube-public            Active   47m
kube-system            Active   47m
kubernetes-dashboard   Active   42m
Step 2: Enable NGINX Ingress Controller
To install the Ingress Controller in Minikube, you just need to run the command minikube addons enable ingress. The output will look as follows.
$ minikube addons enable ingress
* After the addon is enabled, please run "minikube tunnel" and your ingress resources would be available at "127.0.0.1"
  - Using image k8s.gcr.io/ingress-nginx/controller:v1.1.1
  - Using image k8s.gcr.io/ingress-nginx/kube-webhook-certgen:v1.1.1
  - Using image k8s.gcr.io/ingress-nginx/kube-webhook-certgen:v1.1.1
* Verifying ingress addon...
* The 'ingress' addon is enabled
The Ingress Controller will be installed in a new namespace called ingress-nginx. You can list the Pods in the ingress-nginx namespace and verify that the Ingress Controller Pod is running.
$ kubectl get pods -n ingress-nginx
NAME                                       READY   STATUS      RESTARTS   AGE
ingress-nginx-admission-create-v25bc       0/1     Completed   0          4m42s
ingress-nginx-admission-patch-njnsm        0/1     Completed   2          4m42s
ingress-nginx-controller-cc8496874-fkz5l   1/1     Running     0          4m42s
As you can see, there are 2 completed Pods, which are deployed by Jobs, instead of Deployments. They are supposed to be in the completed state. And you can see that the ingress-nginx-controller Pod is in running state.
Now that we have the Ingress Controller running, we can write an Ingress manifest to expose the Kubernetes Dashboard app!
Step 3: Create an Ingress Resource
The next step is to create an Ingress resource as shown below to expose the Kubernetes Dashboard.
apiVersion: networking.k8s.io/v1
kind: Ingress

metadata:
  name: k8s-dashboard-ingress
  namespace: kubernetes-dashboard

spec:
  rules:
  - host: dashboard.com
    http:
      paths:
      - pathType: Prefix
        path: /
        backend:
          service:
            name: kubernetes-dashboard
            port:
              number: 80
To create the Ingress resource, put the above manifest into a YAML file and apply it.
$ kubectl apply -f dashboard-ingress.yaml
ingress.networking.k8s.io/k8s-dashboard-ingress created
Once the manifest file has been applied, verify it by running the kubectl get ingress command.
$ kubectl get ingress -n kubernetes-dashboard
NAME                    CLASS   HOSTS           ADDRESS        PORTS   AGE
k8s-dashboard-ingress   nginx   dashboard.com   192.168.49.2   80      6m39s
Notice that the host is shown as dashboard.com and there is an IP address bound to this host. If you don’t see the IP address right away, wait for a few seconds as it might take some time.
Now, something that is important to remember is that we are running Minikube on Docker Desktop here, in a Windows machine. This means that the IP address 192.168.49.2 shown here is actually internal to the Docker network and not directly reachable from our Windows host.
Step 4: Start Minikube Tunnel
To expose the Ingress externally, we need to bridge that gap using minikube tunnel in a separate command line or a PowerShell window.
C:\Windows\System32>minikube tunnel
* Tunnel successfully started

* NOTE: Please do not close this terminal as this process must stay alive for the tunnel to be accessible ...

! Access to ports below 1024 may fail on Windows with OpenSSH clients older than v8.1. For more information, see: https://minikube.sigs.k8s.io/docs/handbook/accessing/#access-to-ports-1024-on-windows-requires-root-permission
* Starting tunnel for service k8s-dashboard-ingress.
This creates a network bridge between Docker and the Windows host, mapping internal Ingress ports 80/443 to 127.0.0.1, making the Kubernetes Dashboard accessible at http://dashboard.com.
The tunnel will only be open as long as the command line is open and the command is attached to the command line. So make sure to keep this command line open.
Step 5: Update the hosts File
The final step is to map the localhost IP address to dashboard.com in the hosts file on the Windows machine, so that our requests to http://dashboard.com will be forwarded to the correct IP address. This will allow us to access the dashboard via the URL http://dashboard.com, instead of the long ugly URL seen in step 1.
On Windows, the hosts file is located at C:\Windows\System32\drivers\etc\hosts. Open it using a text editor as Administrator and add an entry as follows.
127.0.0.1 dashboard.comNow you can reach the Kubernetes Dashboard just by typing in http://dashboard.com in the browser!
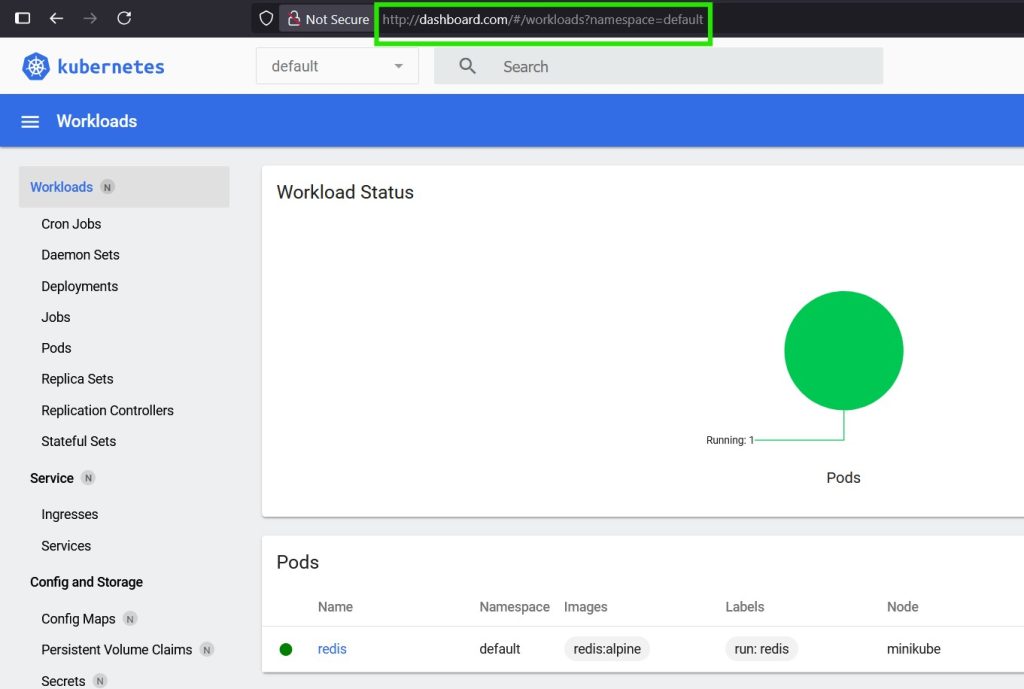
Notice the URL is much more user friendly unlike the one we so earlier.
Conclusion
- Ingress cannot run on its own. It has two main components.
- Ingress Controller + Ingress Resources = external access to the cluster via HTTP(S).
- Ingress Controller runs cluster-wide. Ingress resources are namespace-specific.
- Perfect for multi-app, subdomain, path-based, and TLS scenarios.
- Provides a clean, modular, production-ready entry point into Kubernetes.
We will discuss more about Ingress in upcoming articles.